

Post the controversial 2016 demonetization initiative and the government’s subsequent decision to promote digital payments; online payment platforms have witnessed unprecedented growth and popularity in the country.
The growing demand in the years since has seen the coming of several players in this category.
These include the likes of Paytm, Freecharge, Mobikwik, Phone Pe, Airtel Money, Jio Money and PayPal to name a few.
But Paytm continues to be the most widely used and popular online payment platform and digital wallet in India by far.
Claiming to have over 150 million users pan-India – it is also the most significant online payments platform in the country today.
Much like the other players in this segment, Paytm affords its many users a number of useful conveniences.
The most obvious one is the facility to transfer money from your wallet to your bank account or even bank to bank money transfer using Paytm.
In this article, I will explain thoroughly how to transfer money from Paytm to bank account & bank to bank transfer easily.
How to Transfer Money from Paytm to Bank Account?
1. Link your bank account
First and foremost you need to understand the technology being used to facilitate the Paytm money transfer to bank account.
BHIM UPI enables money transfer services on Paytm – the revolutionary new technology which allows the transfer of funds to a bank account directly – using just your mobile number.
To take advantage of this convenience, all you need to do is link your bank account(s) to your Paytm account and set up your UPI PIN.
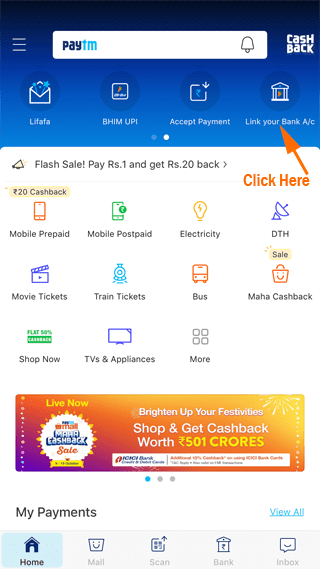
Open your Paytm app in your mobile and click on ‘Link your Bank A/c' as shown in the image below-
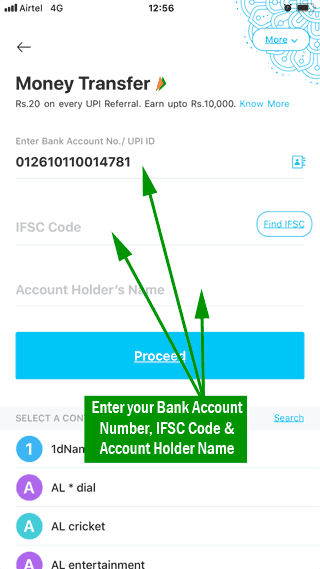
On the next screen, you need to add your bank account number, IFSC code and Account holders name as shown below.
Next it will reconfirm your account number and confirm your bank account details by sending OTP to your registered mobile number.
Once your account is confirmed and your account is linked successfully, it will ask you to setup UPI PIN.
2. What is a UPI PIN?
Your UPI PIN is nothing but a 4 digit secret passcode which is known only to you to safely enable money transfers from your bank account to another bank account.
You need to provide debit card details of your linked account number to setup your UPI PIN.
Once you have decided on yours, its then securely stored with the National Payments Corporation of India (NPCI), along with your account details.
These details and your UPI PIN are only authenticated (on secure servers) every time money is debited from your account using the Paytm UPI.
3. Transfer money from Paytm to bank account
First I will show you how to transfer money from your Paytm wallet to your bank account and then I will show you how to transfer money from your bank account to another bank account.
Transfer money from Paytm wallet to bank account
Here are the exact steps to follow (with images) in order to send your Paytm wallet to your bank account.
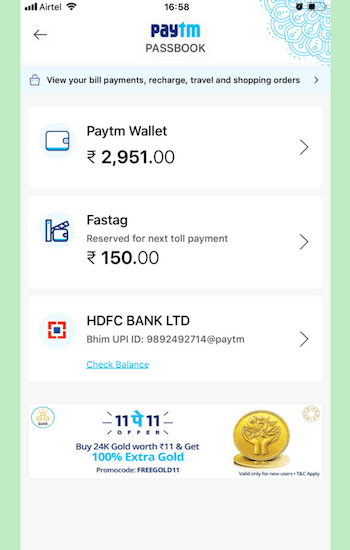
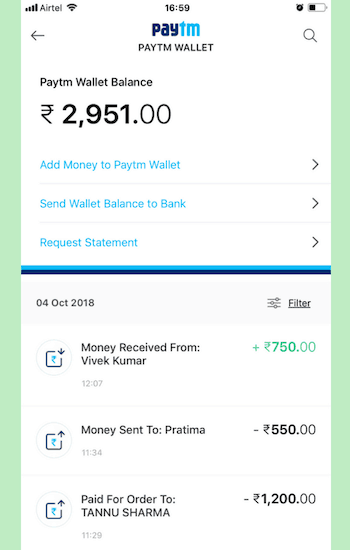
1. Open Paytm app on your mobile and tap the passbook icon. You will see your wallet balance. Now tap ‘Paytm Wallet'.
2. Next, you will get the following screen. There click the link ‘Send Wallet Balance to Bank'.
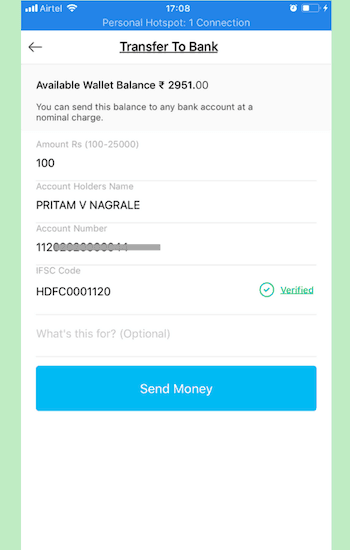
3. It will show you all the linked account. You need to enter the exact amount you want to withdraw and select bank account where you want to transfer your wallet balance.
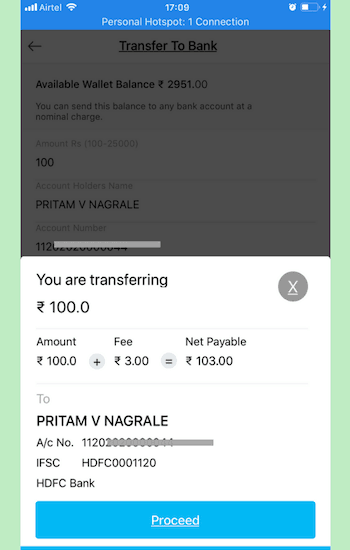
4. It will show you details of money transfer with Paytm to bank transfer charges (currently 3%). Tap ‘Proceed' button.
5. Next, it will ask you to confirm OTP. You will receive OTP on your registered mobile.
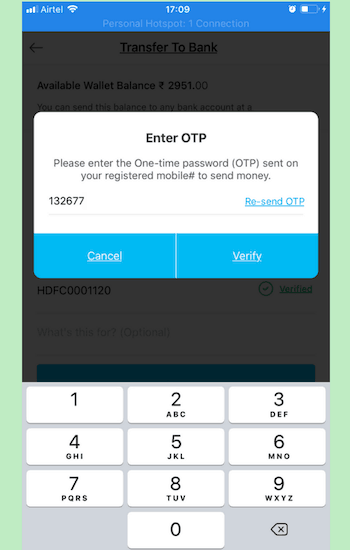
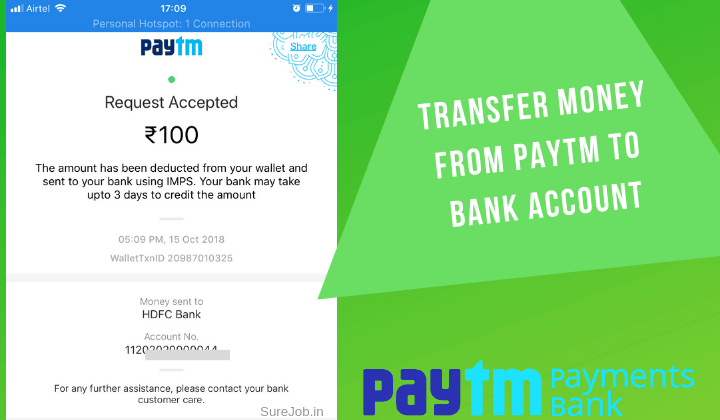
6. After confirming the OTP, you will see the screen message “Request Accepted”. When I made this transaction at 5 pm in the evening for Rs. 100, I immediately received the message from my HDFC bank for this transfer.
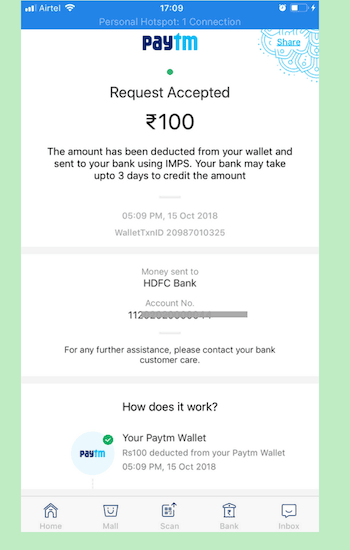
It takes less than 2 minutes to transfer money from Paytm to your bank account.
Bank to bank transfer on Paytm
If you have already linked your bank account in Paytm then here are the steps to follow for bank to bank transfer on Paytm.
- Open the Paytm app on your mobile phone.
- You will find ‘Bank Transfer‘ icon on the top. Tap the icon to initiate bank transfer.
- Enter all the relevant details of the account holder including account number, IFSC code and account holder name. You can also send money to someone's bank account using mobile number if he has linked his bank account in Paytm.
- Punch in the exact amount that you wish to transfer (PS: you can also add a message, with your money transfer) and initiate.
- If the transaction is successful, you will see the message on screen “Money Transfer Successful”.
4. Points to Remember
- Paytm bank transfer from your bank to another bank account is free.
- However Paytm charges a 3% processing fee, to transfer money from Paytm wallet to a bank account. This fee is likely to be raised to 4% w.e.f. November 09, 2018.
- Bank transfers can only be done using the Paytm app using your registered mobile number.
- Paytm is an RBI-approved wallet and uses the latest safety protocols to ensure your money remain secure throughout the transfer process.
- Non-KYC users can load upto INR 10,000 in their Paytm wallet.
- KYC-compliant customers can credit INR 1,00,000 in their wallet, have no spending limit and are also eligible to open a Paytm Payments Bank account, on sharing their PAN card details.
5. Procedure to Complete KYC
There are two ways to become a KYC-compliant Paytm customer.
You can either opt to call a Paytm representative to visit your home and verify your documents or visit the nearest KYC centre with your set of documents.
Documents Needed for KYC
You can get your KYC done one of two ways.
Biometric:
This involves visiting an authorised KYC centre and giving your thumb imprint for biometric verification. Until recently sharing your Aadhar Card details were a mandatory part of this process, however, post the recent Supreme Court ruling, this may not be the case anymore.
Non-biometric route:
You can also become a full KYC Paytm user by submitting any one of the five documents mentioned below.
- Pan card
- Valid Driving License
- Passport
- Voter ID Card
- NREGA Card
However, users opting for this route may have to wait up to 3 days to become a fully KYC customer.
6. Other Benefits of Using Paytm
As with all digital wallets, Paytm is not only about transferring your money from the wallet/bank to another bank account/wallet and vice versa.
In fact, it comes with a host of other benefits and conveniences.
- You can use the cash lying idle in your Paytm account to make a number of regular payments – for your utility bills (water/electricity/internet).
- Buy a mobile/DTH recharge, pay your restaurant/movie/shopping/grocery bills and even book your flight/train/bus tickets online.
- Ola & Uber rides can be booked through Paytm.
- If you want, you can use the cash in your wallet to buy a variety of products from their e-commerce portal.
- You can also make offline payments, by scanning the QR code and entering the OTP to authorise the payment.
In Conclusion
A Google-BCG Report estimates that India’s digital payments industry is slated to touch the whopping US $500 billion by the year 2020 – contributing to approximately 15% of the country’s GDP.
A significant driver of this growth will be India’s smartphone user base, which is already the second largest in the world.
For regular users of leading digital payment platforms like Paytm, this can only translate into a win-win situation of being able to use a fast, reliable and secure payment platform to meet all their financial needs without the usual hassles.