
Are you thinking of starting your own Blog? This is really a great decision!
Though you can do blogging part time, thousands of bloggers in India, USA and other countries including me are making six-figure income.
In this post, I am going to explain how you can create a blog without much effort. There is not much investment for starting a blog.
You can start making money like thousands of other bloggers and of-course like me.

The best thing about running a blog is you not only make a good income with it but there are various other things that come with blogging.
My name is Pritam Nagrale. I am one the top (you can say famous ????) Indian blogger. I started my first blog in 2009.
I personally took interest and started blogging for two great reasons.
- I had a desire to help people online and
- Of course to generate some revenue with it.
There are many other good reasons for starting your own blog for example-
- Blogging brings out a hidden writer in you and makes you a better thinker.
- You get to know thousands of new readers and followers through comments & feedback, social media interactions and email.
- You inspire and help other new bloggers through your blog.
- You can sell your own products or services through your blog.
- You get instant fame and more confidence.
Be it any reason, the point I want to make is, a blog could be a very powerful means for achieving many different goals.
With so many other benefits, you get a chance to create a blog with a very low investment. Hence why not to create your own blog today?
You just can’t overlook this wonderful opportunity.
I will take my own example. I launched my blog in 2009. Initially, for almost 2 years I was unable to do much with my blog but during that period I learned many things about blogging.
After 2 years, I launched two new blogs SureJob.in and MoneyConnexion.com.
For the next few years, I single mindedly focussed on these two blogs and in just 5 years I was able to earn more than $1 million.
I purchased two new apartments with that money and in the previous year I bought a brand new BMW 520d Luxury Line. In addition to that, I frequently get to travel exotic places around the world at least twice a year with my whole family.
I am able to afford this kind of lavish lifestyle only because of blogging. (To be honest, I run more than 2 blogs.)
After achieving success I would like to help out other bloggers who are interested in learning blogging.
So let us get started!
Free Blogs vs Self Hosted Paid Blogs
There are two ways to create a blog- first one is free and the other is by paying $40 (Rs.3000) for a domain name and hosting.
If you want to start a blog for free then go with Blogger.com, Wix.com, WordPress.com etc. but there are many serious limitations if you are creating a free blog with any of these blogging platform.
To help you understand I am giving you six solid reasons why you shouldn’t create a free blog.
- If you are going for a free blog then Domain name of your blog will appear something like YourBlogName.blogspot.com or YourBlogName.wix.com which is too lengthy to read as compared with a paid blog that is very short and reads YourBlogName.com.
- You will have to face serious challenges while designing your blog on these platforms.
- Monetization can become very hard affecting your revenues adversely.
- If in future, you plan to shift your blog from free to paid platform, the whole process will be difficult and while shifting you might lose some of the traffic and revenue.
- Your followers, readers, advertisers and clients are not going to take you seriously anymore.
- Finally, you are not in full control of your website content because everything is in the hands of the free CMS (content management system) you are using. If anything they don’t like about your blog, they can suspend your blog and you won’t be able to do anything.
I hope the above mentioned 6 reasons are good enough to persuade you not to create a free blog.
And if you like to purchase a self hosted blog with any web hosting company, you need to pay $100 or even more.
But in this blog post, I will tell you how you can get a self hosted blog with all the features in less than $50. You will also get a free domain and free SSL certificate with this particular domain.
How to Start Your First Blog
Now you can launch your own blog – right from booking a domain name to hosting it for just $60 (Rs 4000/- in India).
You can set up a blog in just 6 simple steps and it takes not more than 30 minutes to complete these steps and start your first blog.
Step 1: Choosing a Right CMS (blogging platform)
Step 2: Selecting an Appropriate Domain Name
Step 3: Selecting Best Hosting Provider
Step 4: Setting Up the Blog
Step 5: Designing Your Blog
Step 6: Start Earning
To get a clear picture and quick help you can also watch this video and follow the step-by-step guide.
Let’s dig deep into each of these steps.
Step 1: Choosing a Right CMS
CMS or Content Management System is mainly a blogging platform or software suite just like Blogspot, WordPress, Drupal, Joomla, Wix, TypePad etc where you will keep all your files together.
There are various blogging platforms available in the market but we will go with one and only platform which is WordPress (WordPress.org). I have listed below some of the good reasons to go with WordPress.
- It's free to use.
- You can design a blog very easily with it because its dashboard is very user-friendly and easy-to-use.
- With the help of 1,00,000+ free and paid themes, WordPress gives web owners so much power and flexibility to design any type of website.
- To this date WordPress offers more than 70,000 free plugins to run your blog faster and efficiently.
- Lastly, there is a big WordPress community present online which is willing to help bloggers with anything they might need like setting up a blog, choosing a theme, adding plugins etc. You can join their WordPress community.
More than 97% of blogs in the world are running on WordPress. Even I use WordPress for all my blogs including this blog SureJob.
Hence I will suggest you to create your website or blog using WordPress CMS only.
Step 2: Selecting an Appropriate Domain Name
Step 2 is the most important step because a domain name represents your blog’s niche. So you have to choose the right domain name that reflects your blog’s niche.
As the very name suggests, my blog “SureJob.in” is all about jobs and career opportunities. I went with this particular name keeping my niche and readers in mind. You also have to do the same thing.
If you are thinking of starting a blog on Football or Cricket then choose names like CricketingWorld.in or SoccerFan.com.
If you love cats and dogs then go with something like CatsNDogs.com or PetsWorld.com.
I believe you understood my point now. You got the idea, what I am trying to say!
Following are a few tips that you need to keep in mind.
#1 Your Domain name must closely reflect the cause of your blog. Check the above video before choosing a domain.
#2 Name should be easy to remember and pronounce.
#3 Always go with a .com extension. You get to target the whole world with .com. If you are unable to get .com for your desired domain, then feel free to choose other extensions like .in, .org, .net, .info, .co etc
#4 If your target country is India then you can go with .in extension.
#5 Don’t use numbers and dash in a domain.
Finalise one of the most appropriate domain names.
Step 3: Selecting Best Hosting Provider
WordPress CMS is just a software kit which helps bloggers to create a blog by placing all the necessary files together in a folder.
You have put together all your files but where are you going to host them?
Well! That is where a hosting provider comes in handy?
A hosting provider keeps all the content of your blog like text files, css files, images, videos etc at one place and makes it accessible to the whole world.
Hence you need a good hosting provider to host your domain name and make it available to the rest of the world.
However, which is the best hosting provider that you are going to choose?
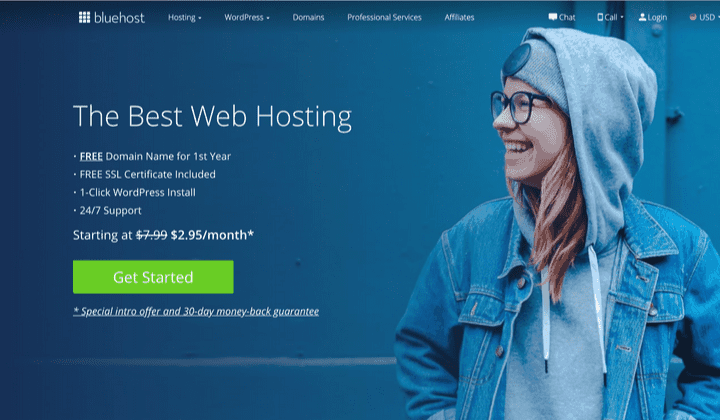
In the last 12 years I have created more than 50m blogs and used more than 20 hosting companies. In my experience Bluehost & Hostinger are some of the most reliable hosting providers for a beginner.
WordPress.org and some of the other famous bloggers also recommend Bluehost as their first choice.
One of the best things that I love about both these two hosting providers is their customer support. You can chat with them online 24×7 and most of the time they resolve any technical issue in just 4 – 5 minutes.
Step 4: Setting Up the WordPress Blog
I have a premier membership with Bluehost and Hostinger for my SureJob family.
If you are buying a plan for 1 website then you can purchase Hostinger web hosting for just Rs 59 per month and if you plan for creating more blogs, you need to pay just Rs 115 per month.
You can purchase Hostinger web hosting using this exclusive link. You can use my exclusive coupon PRITAMNAGRALE, to get an additional 10% discount.
Bluehost web hosting will cost you just $2.95 per month but it offers so many features. You can buy Bluehost web hosting by going through this special link.
The steps that you have to take for starting a new blog are the same for Hostinger as well as Bluehost. But here I am going to take Bluehost as an example.
By the way both these companies give you a domain for FREE.
So you can go ahead and create your own first blog.
To make things clearer and simple to new bloggers I am explaining using pointers in images.
- Visit Bluehost here.
- Click on the green colour button named “Get Started“.
- After clicking, you will be taken to the hosting plan’s page. Bluehost offers four plans, they are Basic, Plus, Choice Plus, Pro. If you want to start just one blog then go with the Basic Plan.
- If your plan is to launch more new blogs in the future then you can purchase Plus Plan. With a Plus plan you can start multiple blogs in future with the same hosting without paying anything extra.
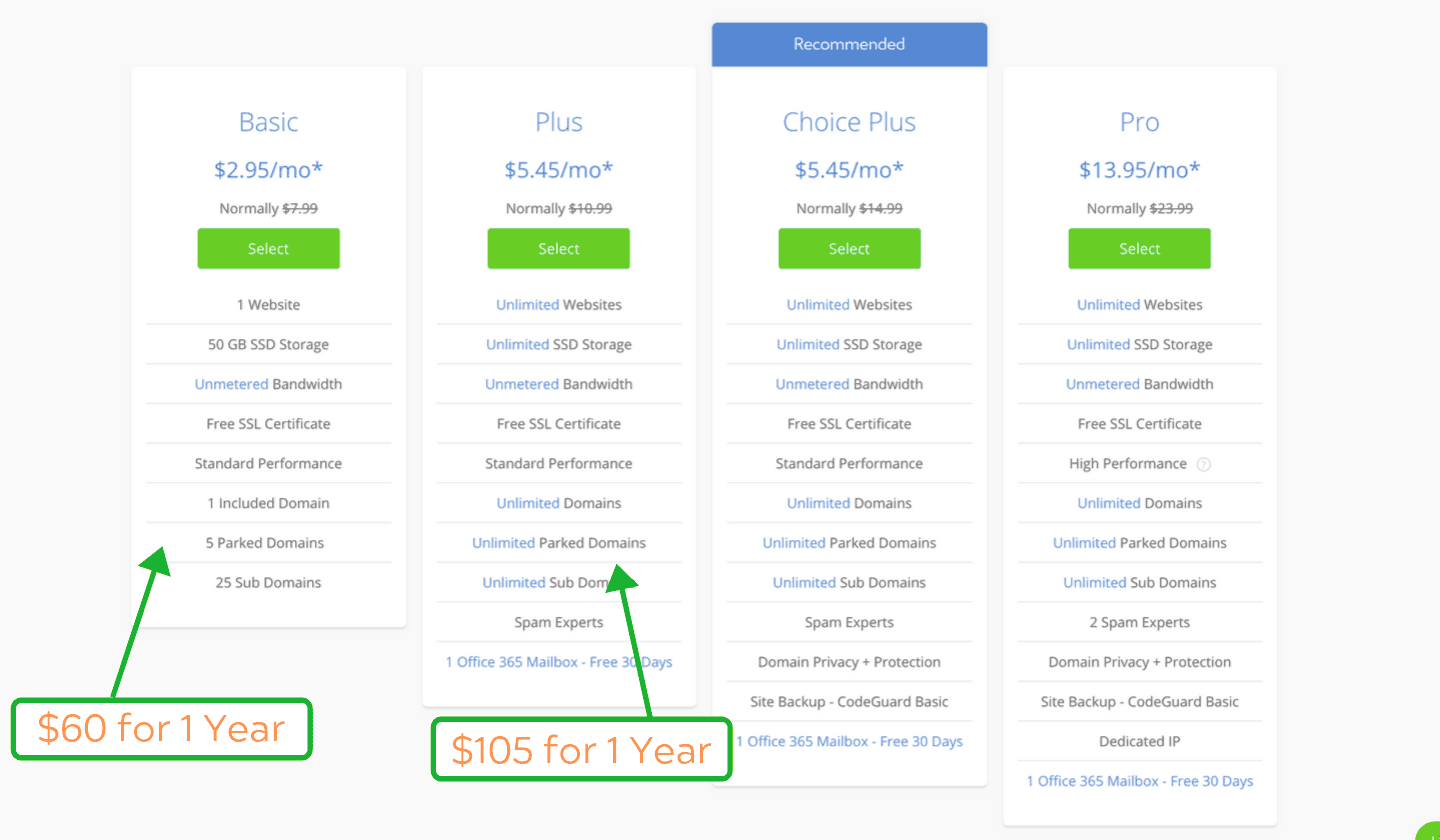
Go through the features and click on the “Select” button.
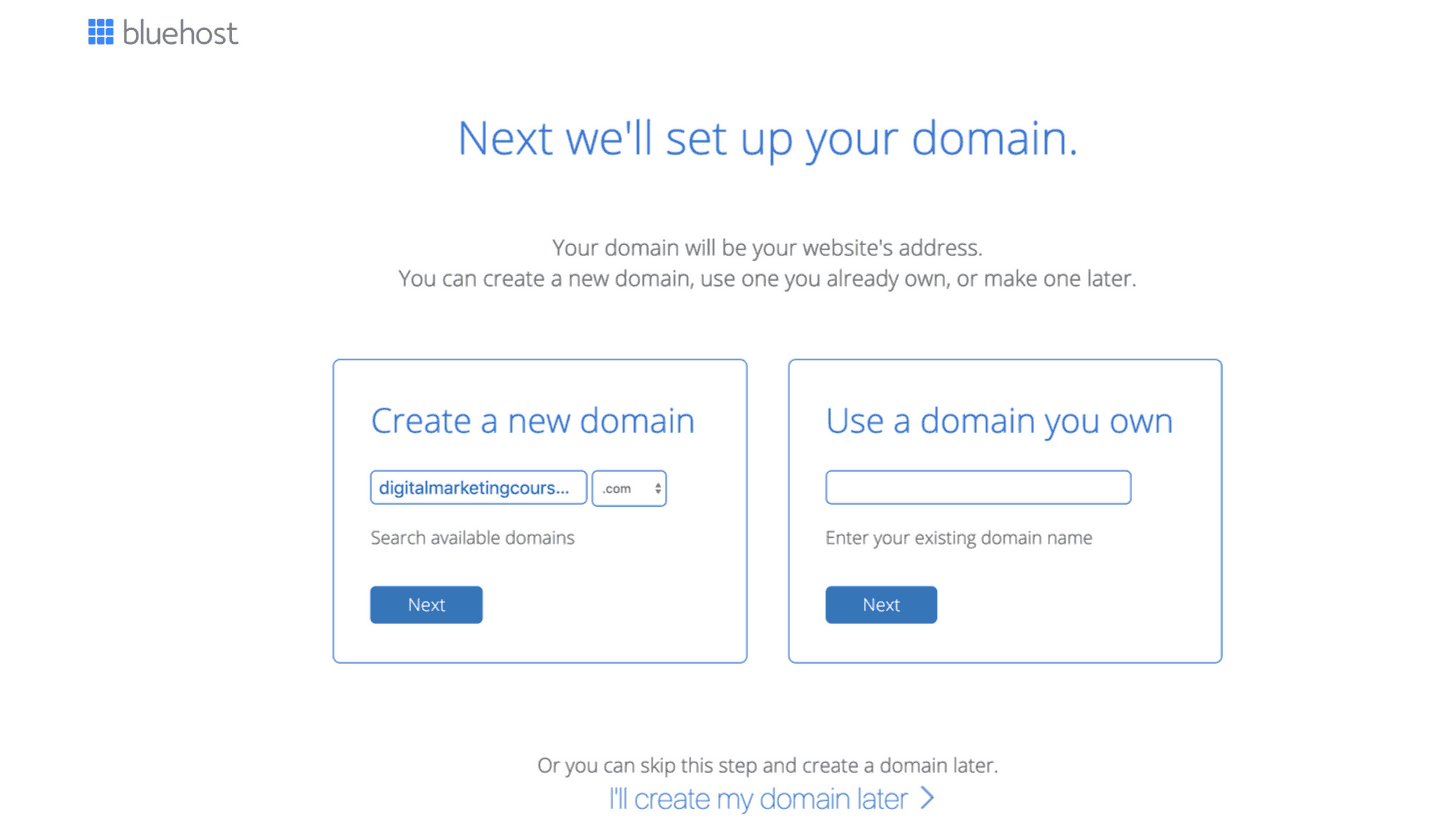
5. In the next page, you are going to add your free domain. You can go back and read step no. 2 for choosing the right domain name. Enter your domain name and click the ‘Next‘ button.
If you want to do some other time then just click “I'll create my domain later”.
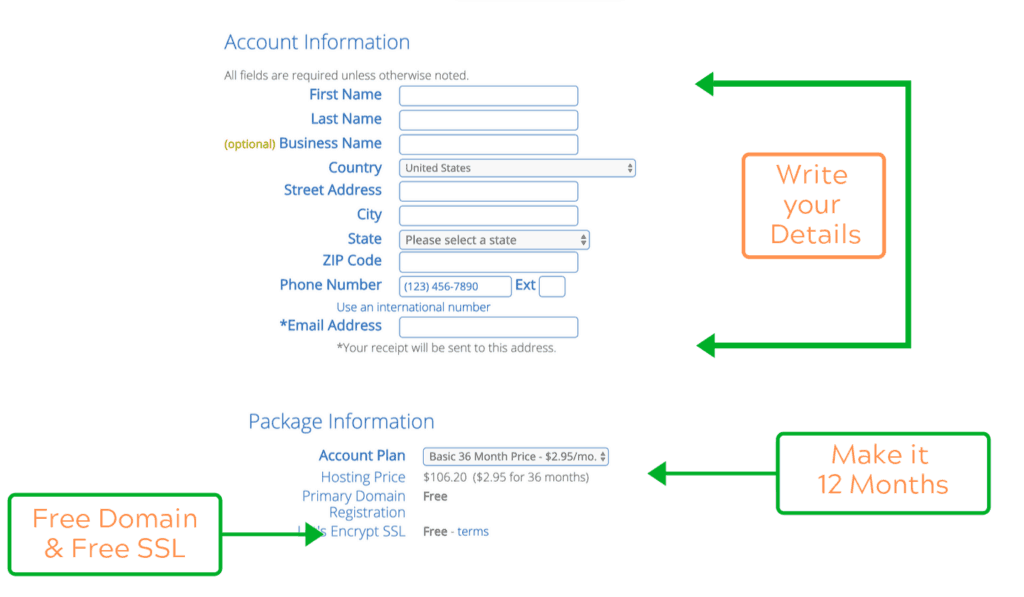
Till then, Bluehost is going to set up your blog on a temp domain. The moment you finalize your domain, it will get added to your blog. This is the domain name I chose digitalmarketingcourseinmumbai.com.
6. On the next page, you have to add account information. Enter your name, address and 6. In the next page, you have to furnish all your account details. Give your name, address and other information. Go for 12 months in ‘Account Plan‘. You also get free SSL along with free domain. SSL makes your blog https. This feature is really good for increasing Google search traffic.
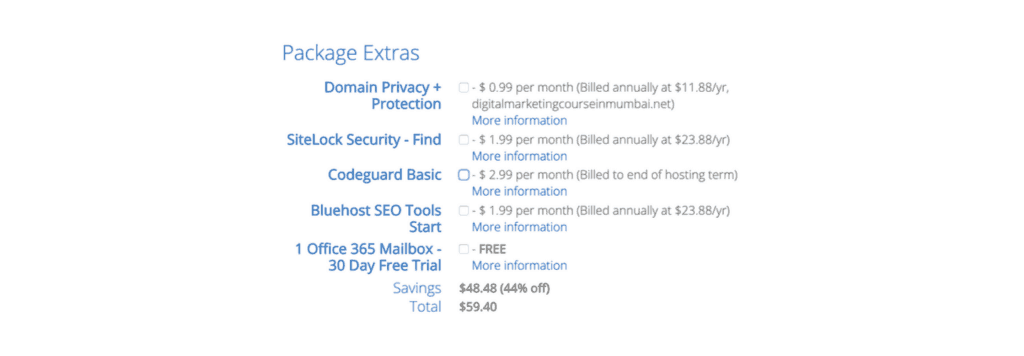
You don't require Domain Privacy, SiteLock Security & Codeguard Basic. You can untick all the 3 Extras in the ‘Package Extras‘.
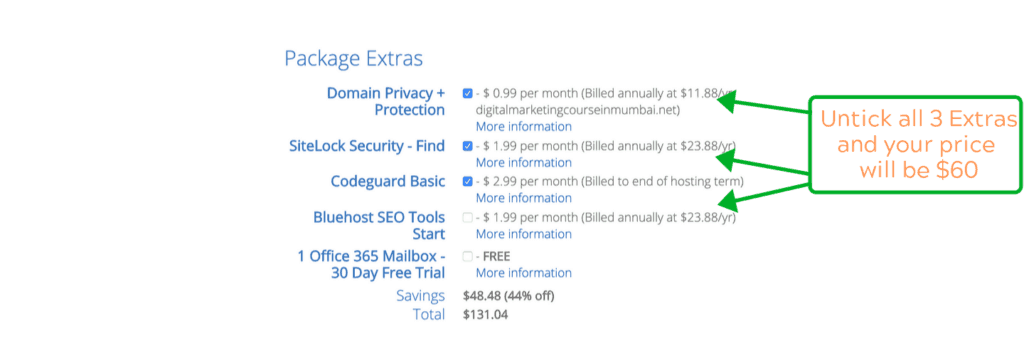
Your Total price will come to $60 after you have removed all the extras.
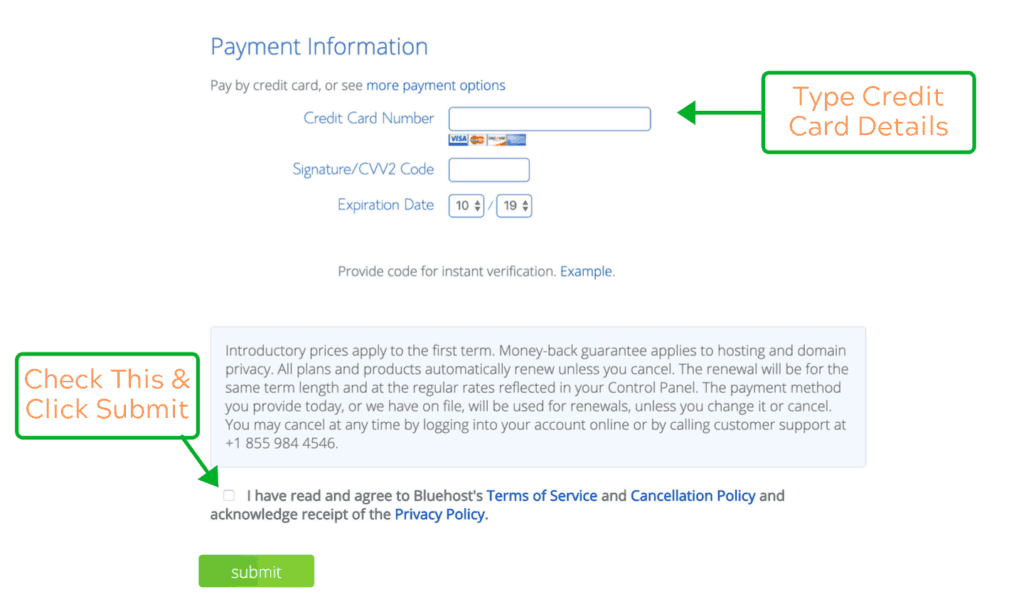
7. After this you have to add your payment details. You can either pay through credit card or PayPal (there are more Payment Options available). Then check the Bluehost terms box and click on the Submit button.
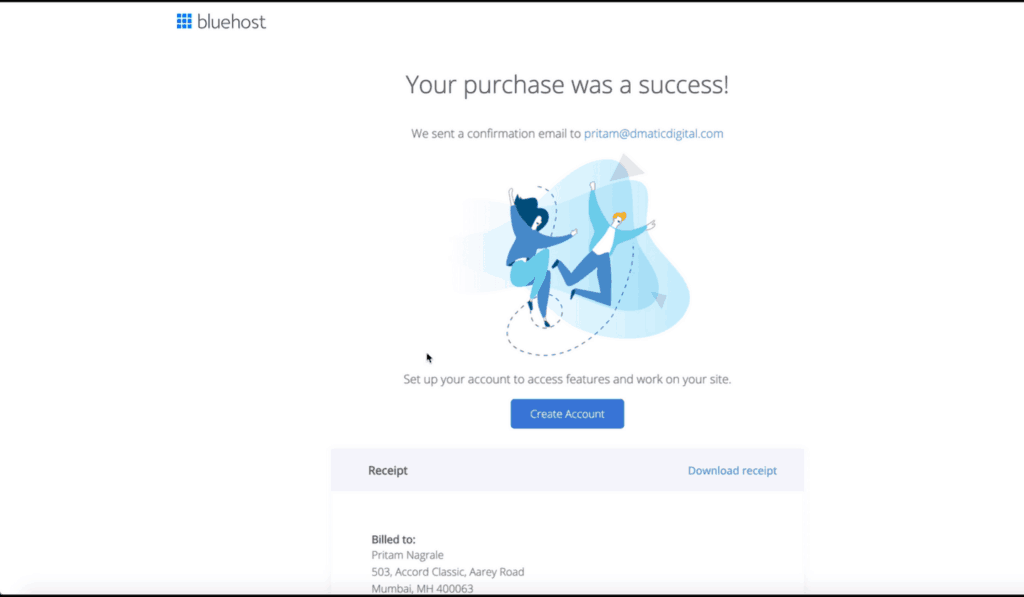
8. After clicking the Submit button, you will receive a success message from the bluehost. Then you can click on ‘Create Account‘.
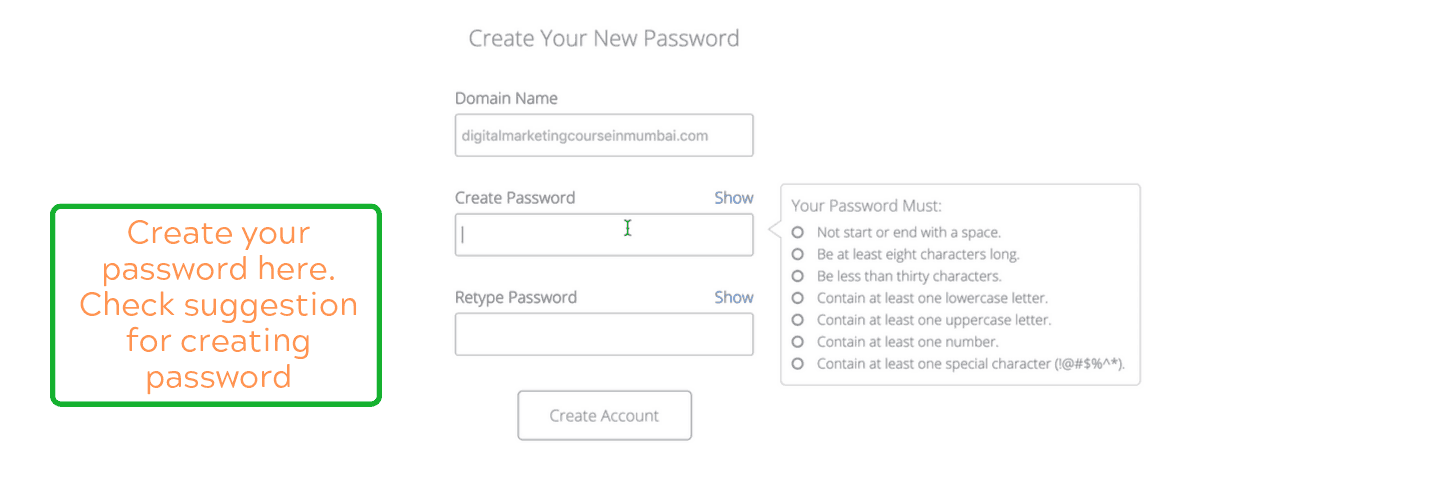
9. On the next page, you have to create your password for the bluehost account. Create a very strong password as suggested below.
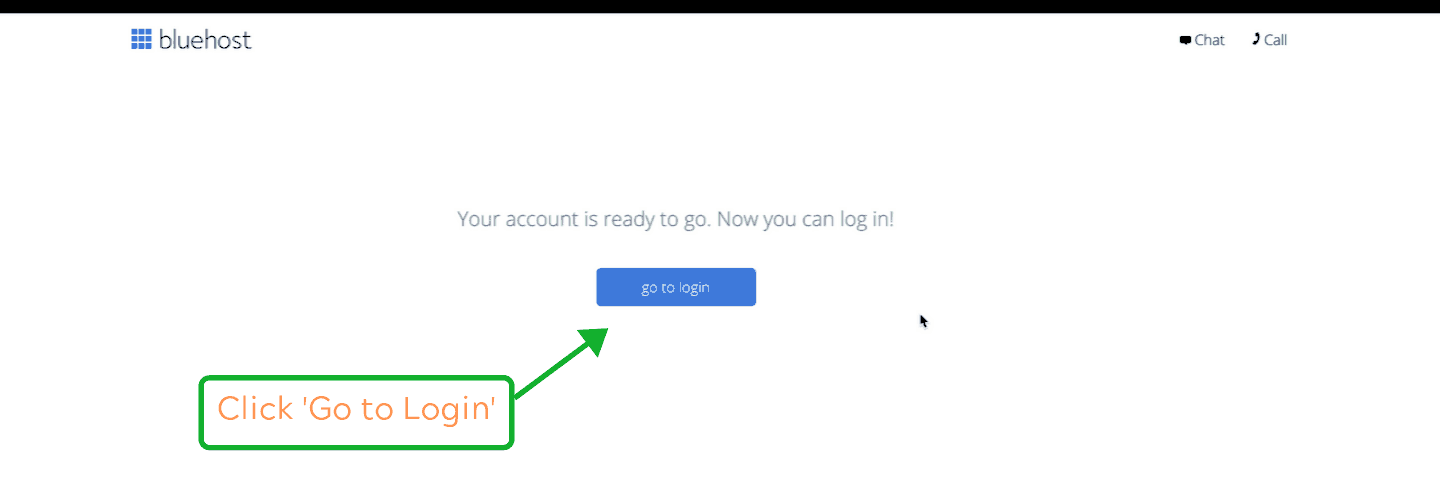
10. On the next page you will come across the Login screen shown below. Click on ‘go to login‘.
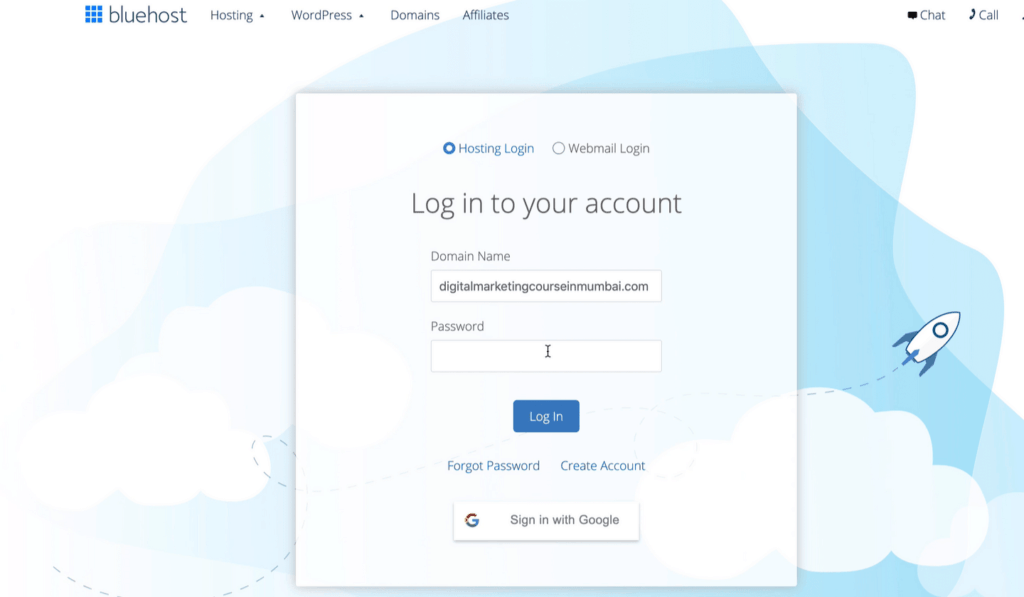
11. Now you can login into your bluehost account with the password you had just created. Enter your password and click ‘Login‘ button.
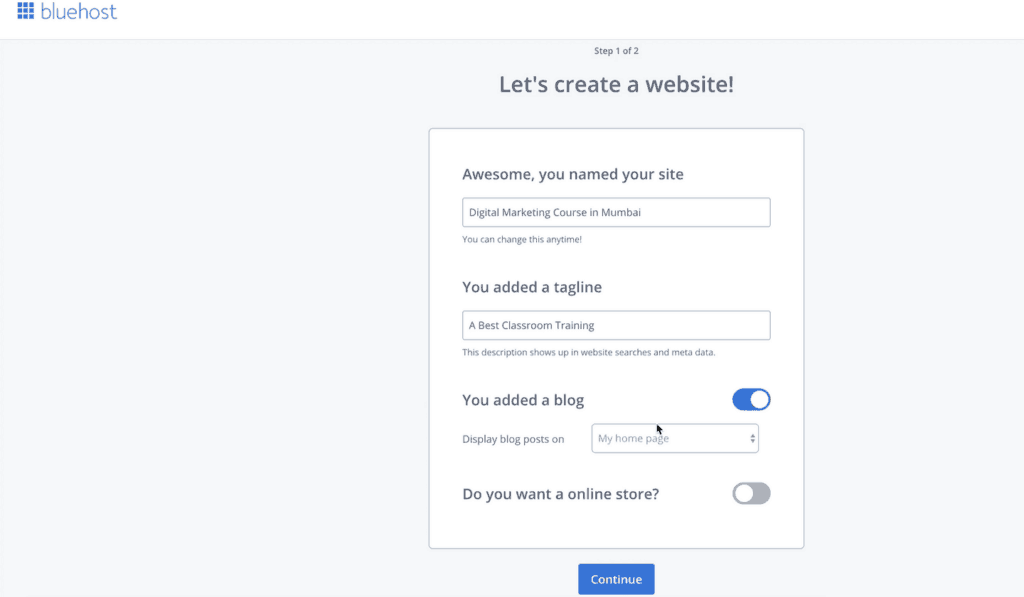
12. On the next page, you have to set up your blog. Add your blog name and a tagline. Enable ‘Do you want a Blog?'. Select ‘My Home Page' for ‘Display blogpost on' option. Then click ‘Continue‘ button.
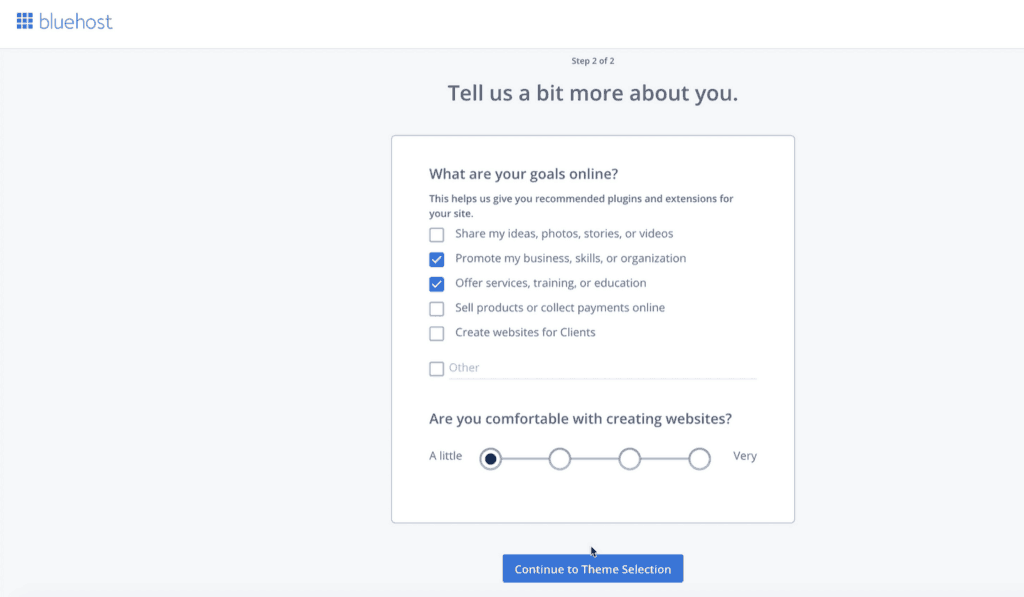
13. The next page will ask you “Tell us a bit more about you”. You can either choose what you like OR you can refer to this image below.
Then click “Continue to Theme Selection“.
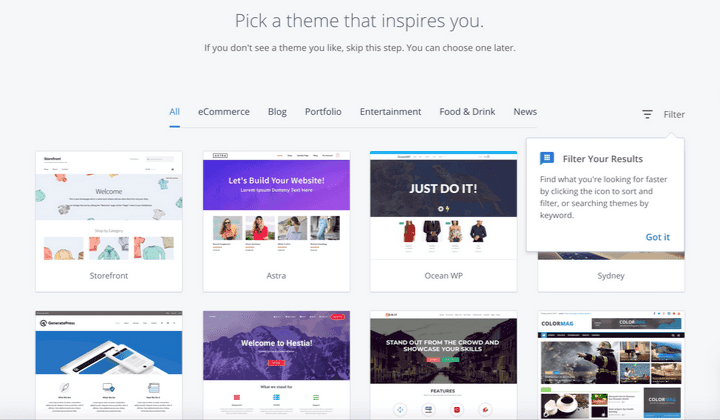
14. On the next page, you can choose any theme that you like. These themes are for free. You can all together skip this step if you do not like any particular theme. If you don't choose any one theme for your blog, then it will automatically install the latest WordPress theme.
15. On the next page, your blog will get set up on a temporary domain as shown below in the photo. In the next 2-3 hours your actual domain will be integrated into your hosting. Bluehost will recommend some settings, you can select any of them. Then click on the blue color ‘WordPress‘ button.

16. You will then be taken to your WordPress Admin Panel. You will be given access to the WordPress Dashboard as shown below.

Now you have to employ all the powerful yet very easy to use WordPress features to transform your blog into a masterpiece.
(You can login to your account by adding /wp-admin into your blog and then login using your email and password. e.g. yourdomain.com/wp-admin)
Step 5: Designing Your Blog
Following are some of the most important tasks you have to perform after creating your first blog.
1. Create a new user
You have already created an administrator account. As an administrator, you are allowed to make any changes to your blog. You can make changes like installing any theme, plugins, creating posts, pages, categories and users and various other things.
Your Admin username and password must be very strong. Spammers and hackers can hack your website with malware if they are successful in learning your admin username and password.
You have to take a couple of steps to avoid this from happening.
- Make your Admin username and password very strong.
- Don’t publish any post or pages using your Admin account and also don’t approve or write comments through the admin account.
You can publish posts, pages and moderate the comments that you get on your blog through an Editor account.
To create an Editor account very easily you can click on Users as shown in the image above.
- Click Users –> Add New
- Enter username, email, First name & Last name of a new user.
- WordPress will suggest a very strong password. Click on the ‘show password’ button to see your password. You can copy this password and note it down somewhere.
- Choose the role as ‘Editor’ from the drop down list menu.
- Click Add New User.
Now if you like to publish a post or a page from an Editor account, you can logout from the option on the top right and login again with the Editor username and password.
Login URL for your blog will be yourblogname.com/wp-admin.
2. Install a theme after starting your blog
When you are installing WordPress to create a blog, WordPress automatically installs a default theme into your blog.
A particular theme is the most integral part of any blog. It defines the look, design, style and layout of your new blog.
There are thousands of free as well as paid themes available for WordPress bloggers.
If you like to install a free theme into your blog, then take your mouse to ‘Appearance‘ and click on themes (see above dashboard image).
Click on ‘Add New’ button and you will be given thousands of free themes. You can also find Featured theme, Popular themes, Latest themes and other such options.
You can make use of the ‘Feature Filter’ option to learn more themes.
Check their details and preview each theme and install one particular theme that you liked the most.
If your budget is high then you can find thousands of paid themes on ThemeForest.
You can experiment with your themes and choose a great design for your blog.
3. Install Important Plugins
WordPress plugins are just like apps that allow you to incorporate more new features into your blog and make it run faster and efficiently. You must install some of the most important plugins if you are starting a blog.
Click on ‘Plugins' (shown in image) and then ‘Add New‘ to install plugins.
Some of the best plugins available are Yoast SEO, JetPack, Contact Form 7, Akismet, Classic Editor, WP Super Cache, Smush Image Compression.
You can find these plugins and click on ‘More Details’ to learn more about each plugin.
Click on ‘Install Now’ button and then click ‘Activate’ button to install and activate the plugin.
You can check out for more plugins in the Featured, Popular & Recommended fields given there.
4. Add Your First Post
Bloggers must write long posts and publish them at least 2-3 times in a week. Your readers should enjoy reading blog posts and demand for more such content.
If you create good and unique content then Google will rank your blog posts high on their search result page which will bring a lot of traffic to your blog.
Write your first 800+ words long blog post and publish it on your blog.
Take your mouse to ‘Posts’ and click ‘Add New’ to add and publish your first blogpost.
Add a title in the ‘Add title’ section & copy your post into the text area. Add a good image(s) to your post. And then click “on Publish” button to publish your first ever post.
Congratulation! You have just published your first blog since you started blogging.
Keep creating and publishing Awesome blog posts.
Some other things you implement in your blog are Adding categories, creating navigation menu etc. You will learn more about this in my next blog post.
Step 6: Start Earning
Blogging has become a popular full time career option in India and elsewhere around the world. Millions of bloggers are earning $1000 to $100,000 per month through blogging.
Blogging is a full time career choice for me. I work 10 hours daily and 6 days a week on my blog. I generate more than $20,000 per month from my various blogs.
So if you would like to make good money from your blog then you need to get serious about your blog.
You invested almost nothing in starting your new blog. But you have to work hard if your target is earning at least $2000+ per month.
Your revenue will totally depend upon the number of visitors you bring onto your new blog. More the traffic you bring in, the more money you make.
There are two important strategies you need to develop to increase traffic.
- Creating great Content
- SEO (Search Engine Optimization)
Focus on creating unique and quality content that readers find interesting, educating, problem solving, entertaining and enjoyable.
Just good content is not enough because your blog may fail to reach a wider audience. In other words, your blog is of no use if it can’t rank high on Google Search engine results. Hence you also need to learn and implement SEO techniques to rank high on Google.
SEO is a very vast topic and to learn it you need at least a few months. Here are some of the useful resources to learn SEO.
You also have to learn social media marketing skills to drive traffic from sites like Facebook, Twitter, Instagram, Pinterest, YouTube etc.
Basically, you have to capitalize all the sources to increase traffic to your blog.
Once you start getting enough traffic to your blog you can monetize it with various online advertising platforms.
Google Adsense is one of the most popular and trusted platforms. You can show Google ads on your blog and earn for each click you get. When it comes to contextual advertising Google Adsense is every blogger’s first choice.
You can also make money by selling products and services on other’s behalf which is also known as affiliate marketing. Amazon Associate is one such example.
As you gain more experience you will come to know a number of others ways to monetize your blog and increase your revenues.
But as a newcomer, keep it simple and focus on one thing, Google Adsense.
Conclusion
So this was a comprehensive guide on launching your first blog for less than Rs 1200 (or $12).
Step 1 to Step 3 are very easy to learn and implement. But you need to read step 4 again and again till it becomes crystal clear to you. We’ve explained it very well using images.
Step 5 is about designing and is also a bit technical. Hence you have to pay close attention to it.
Finally Step 6 is very important because you’ve to implement it every day in your life as a blogger. Because unlike step 1 through step 5, step 6 has to be implemented only once.
Happy Blogging!